This tutorial is intended for beginners in printed circuit board design who wish to design a Schematic using the OrCAD Tool. In this tutorial:
Bill of materials is a the list of the components along with the part number of the component, its manufacturer, description and mention of whether this component is not to be populated. You can add more fields if you need to. Usually a Bill of Materials contain following fields
1. Reference
2. Part Number
3. Manufacturer
4. Description
5. Pop Option
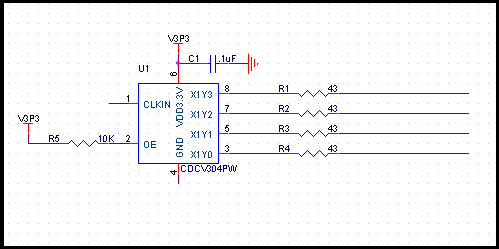
Let us assume that we have a circuit as shown below.

Although we can generate the Bill of materials using a simple xl sheet, this process has chance of error, if the file becomes very big. You may miss some components in manual process. So it is better to follow the process of automatic Bill of Materials generation. You may make small changes in the generated Bill of materials later on.
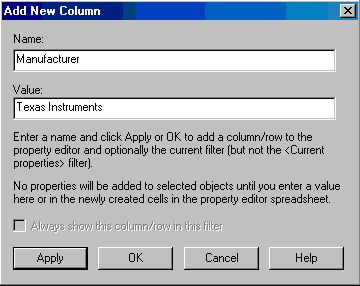
We should add details of all the components. DOuble click the IC U1. Click on "New Column" and in "Name" Write " Manufacturer". In the "Value" field, write "Texas Instruments". It should look as follows

Do the same thing and add Name, Values pair for Description, Part Number,Pop option. The Reference, which denotes the reference designation is automatically already created when you place the part. If a component is not to be populated write NP in the value field of Pop Option.
Repeat the same think with the capacitor C1 , the 10K resistor R5 and 43 Ohm resistor R1. We notice that, the resistor R2 to R4 are same as that of R1, so we just need to copy these properties. There will come instance where we will have hundreds of components of same values differing only in part reference. We can not make changes in individual components. We do it using semi automatic process.
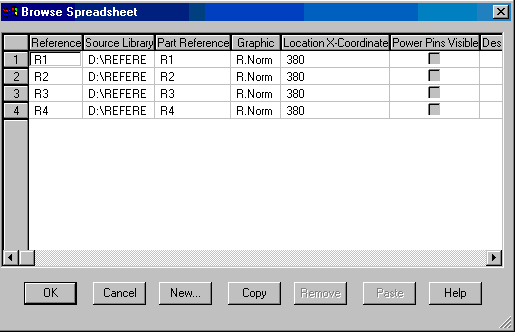
Come out of the schematic page and select the top level hierarchy. Click on Edit -> Browse Parts. You should see something similar to

Now select R1 to R4 using shift key. Click edit -> properties.Browse horizontally to "Part Number". Now copy the value against R1 and paste it in R2 to R4 in the column under Part Number. Repeat the same thing with Manufacturer and description. After completing click ok.
When you have updated all the components, you can proceed to generate the Bill of Materials. Click on tools -> Bill of Materials. In the header you may write the following
Item\tQuantity\tReference\tManufacturer\tDescription\tPart Number\tPop Option
In the combined property string write the following
{Item}\t{Quantity}\t{Reference}\t{Manufacturer}\t{Description}\t{Part Number}\t{Pop Option}
Notice the the fields will change if you have given a different value to the part filed. If you check the View Output Box, you should see an output similar to
| Revised: Tuesday, October 14, 2008 Revision: Bill Of Materials October 14,2008 17:18:33 Page1 Item Quantity Reference Manufacturer Description Part Number Pop Option ______________________________________________ 1 1 C1 AVX Cap 0.1uF 0603, 20V 0402YG104ZAT2A 2 3 R1,R2,R3 Rohm RES 43 OHM 1/16W 5% 0402 SMD MCR01MZPJ430 3 1 R4 Rohm RES 43 OHM 1/16W 5% 0402 SMD MCR01MZPJ430 NP 4 1 R5 Rohm 10K Res 0603, 5%, 20V MYUNCLE10K 5 1 U1 Texas Instruments 140 MHz General Purpose and PCI-X 1:4 Clock Buffer CDCV304PW |
You can now save this file in a txt file. Chop the top three lines in the txt file and import it in a xl sheet using file import. You can now view it in a more user friendly way. You may need to make some adjustments and changes back and forth till you get a reasonable error free BOM in the xl sheet.
Also: