 SX based
O’Scope.
 SX based
O’Scope.
It is a simple oscilloscope project based in a SX28 microcontroller from UBICOM, it doesn't try to be an exact instrument measurement, only try to demostrate, with a very low cost and low quantity of materials, how much we could get from an SX28 plus the EPP parallel port in a PC.
Let me to leave to the people who read this article to experiment with it, make some changes, or apply new ideas. If you like you could write to me at btxsistemas@ciudad.com.ar .
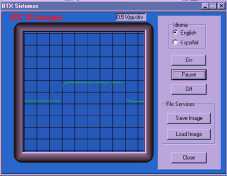
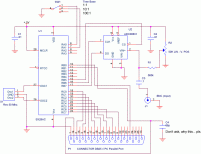
I accompany in this article, the complete schematic diagram for the scope, a picture with the software in action and all source code, for both the SX (osc.src) and the PC (sxo-cpp.zip). [ed: a board layout was also submitted for the Olimex sponsored PCB contest]
The project is in a basis of two parts, one is the SX code which implement all A/D conversion, the EPP communication, and the sampling of the wave to measure.
The second part is the PC software that only reads the samples sent by the SX and show its in a window.
This lets the PC software to be not responsible about the maximum wave frequency to be tested, and leave to the SX code all the quickly job, taking advantage of the 50 MIPS.
I think that using a different A/D converter in this project, you could get more than 5 Mhz wide of band for the scope.
 About SX code:
The original idea to take samples as quickly as possible with the SX28 in this project is the following:
The samples taken by the A/D converter will be only 128 (total) each PC screen, to do all the things quickly, I’ve put all samples in the SX RAM memory, so after each sample taken by the AD converter, I save it in a different memory address, which will be incremented by the IND register for the next samples, once the input wave was sampled an the memory if obviously full, I send the entire SX memory content to the PC parallel port to show it in the PC screen. And then all begins again.
You could see at the code that I am sending, to look for all this. You’ll see at the first part of code too, that I check for the SW1 switch, to know which will be the time-base to use. I try to get three different levels, one is the most quickly, where the samples are taken only one time each ,in the second I take ten times the same sample loosing time, and in the third 100 times to loose more time for lower frequencies. Why I used this method ?? because I lose a proportional time in a different time-base without caring the cycles in each part of the code.
OK at this point we have a lot of different possibilities to change or to add, I think the first and most important to get more speed, for measure higher frequencies, is the change of the AD converter, in this project to demonstrate the work, I was using the ADC08831 which have a conversion time of 4 uSseg. Max, so think about a parallel FLASH AD converter would be tempting , per example clocked by an external clock unit, where all SX time needed to take a sample would be only read a entire RB port, and changing the EPP control handshaking lines to the RA free port pins.
And what do you think about to use a SX48 or SX52 ?? we could take 256 samples each time using the same method. And running at 100 Mhz. Wow !!.
It is better to think in a FIFO memory to save all samples, and get a bigger quantity of samples in each frame with a parallel FLASH AD converter like I said before, but, what will we do with the SX ?? perhaps we don’t need it, so.. we could think a lot of different possibilities but that is your work ( If you have more time and money to try that ).
Finally, if you haven’t an ADC08831 to test the project, you can only replace the "conver" part of the SX code with just generated some numbers, simulating for example an square wave.
The PC software was entire programmed in Visual C++ 6.0, all the code is available for you , the idea was to create an small window into a dialog based application, which shows you the wave measured with the hardware. Let me call this window as the "view" window pls.
OK To obtain a good speed to redraw the view window, I created a DIB ( Device Independent Bitmap ) into this, and used the BitBlt function to draw the contents of it. Like I was not using "trigger" function for the O’scope in this project, I did the redraw each 250 mSeg , but you could adjust it until 1 mSeg to obtain a good quantity of frames / Sec. OK I could write several pages of text about all the code but in this article it is not the purpose, any doubts or suggests, let me know please.
I will comment now the principal parts of the code.
First at all, the size of the "view" window is 256 by 256 pixels, and all the job is cook in the "RenderView" function, just enter in this, I configured the LPT1 port and the the control port value to work with a EPP mode, immediately I read the 128 samples sent by the SX code and put them into an array named "buffer" in which I left each sample with a empty byte between them ( I’ll explain, why this after). I did all the read part into a "for" loop, and then I correct the negatives values into another "for " loop, adding 256 if necessary.
If you are thinking about, why 256x256 pixels in the view with only 128 samples, the answer is, because I make an average of all samples taken by the SX and put its in the holes left in the buffer array, so after this our resolution will increase in 256 pixels sampled.
Like the maximum value sent by the SX for one sample is 255, here we have the 256 by 256 window view.
We can see into the RenderView function too, a piece of code with three "for" loops that draw the background screen and the black lines in the view.
Finally the type to pass, all buffer values into the DIB, needs to be looked with some care, because the DIB is drawn by one column each, instead rows.
I put a language check button, so you can check the better choice for you , and a pause button to obtain a freeze of the picture, plus a "file services" frame with two buttons, to save or load any pictures if you want.
OK That’s all folks, and I hope, that you enjoy it
Alberto Geraci
BTX Sistemas.
See:
See also: