AOLpress Help
Creating or Altering Table Cells
 See the tutorial lesson on
tables for a hands-on example.

 To create a table:
Note: If the items you want to place in the table are already in your page,
you should highlight them before choosing to create the table. When you create
the table, the table cells will be filled with the paragraphs you selected
(from left to right and then from top to bottom). Lists, forms, and other
tables are not split up; the entire list, form, or table is placed in a single
cell.
-
Choosing the
Table
 Create
Table menu item while your cursor is at the point where you want to create
a table, opens the Table window.
-
Set the number of vertical columns and horizontal rows you want in your table.
(It's easy to change these numbers later.)
-
If you want the table to have a caption, type the text for in the
Caption field. The caption will be centered from left to right either
Above or Below the table.
-
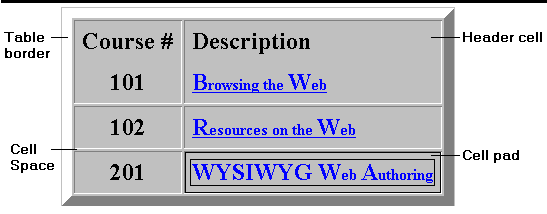
The fields at the bottom of the window control the borders and spacing of
the table.

-
If you want to hide the borders of the table, uncheck the Border box.
(You can choose
Format
 Show
Border while you are editing a table without borders, to make the table
easier to edit.)
-
The Border Size field lets you set the width (in pixels) of the outside
border of the table. If you make the Border Size a larger number (for
example, 10), the table will look like it has a picture frame.
-
The Cell Space field lets you set the width (in pixels) of the borders
between the individual cells in the table.
-
The Cell Pad field lets you set the amount of blank space (in pixels)
between the text or other contents of a cell and the borders of that cell.
You can think of this field as setting the margin widths of the cell.
-
Click OK when you are ready to create the table.
-
If you want to change any of these settings later, just put your cursor inside
the table and choosing the
Table
 Alter
Alter
 Layout menu
item.
Adding or Deleting Table Cells

 To add rows and columns:
-
Place your cursor in the row or column after the row or column you want to
create.
-
Choose the
Table
 Alter
Alter
 Insert Row
or Table
 Alter
Alter
 Insert Column
menu item. An empty row or column will be added before the row or column
containing your cursor,

 To add rows to the bottom of
your table or columns to the right edge of your table:
-
Choose Table
 Alter
Alter Layout .
-
In the Table window, increase the number of rows or columns in the table.

 To delete rows and columns:
-
Place your cursor in the row or column you want to delete.
-
Choose the
Table
 Alter
Alter
 Delete Row
or
  Alter
Alter
 Delete Column
menu item. The row or column containing your cursor will be deleted.
See also: Table Examples - (Formatting
you can add by editing the HTML directly)
Help Table of Contents


![]() See the tutorial lesson on
tables for a hands-on example.
See the tutorial lesson on
tables for a hands-on example.

![]()
![]() To add rows and columns:
To add rows and columns:
![]()
![]() To add rows to the bottom of
your table or columns to the right edge of your table:
To add rows to the bottom of
your table or columns to the right edge of your table:
![]() To delete rows and columns:
To delete rows and columns: