THE TRACKING SOLAR COOKER
Copyright 1987, 1988, 1990, 1992, 1993 by
C. Alan Nichols P.E., C.E.M.
Tucson, Arizona
All rights reserved
1
INTRODUCTION
The concept of solar cooking began over 220 years ago and was used
by the French Foreign Legion starting in the 1870's. All solar cookers work on
the principle of concentrating the direct solar rays to raise food or water to
cooking temperatures. Cooking temperatures begin at about 150 degrees F.
although temperatures of 250 to 400 degrees F. are preferred.
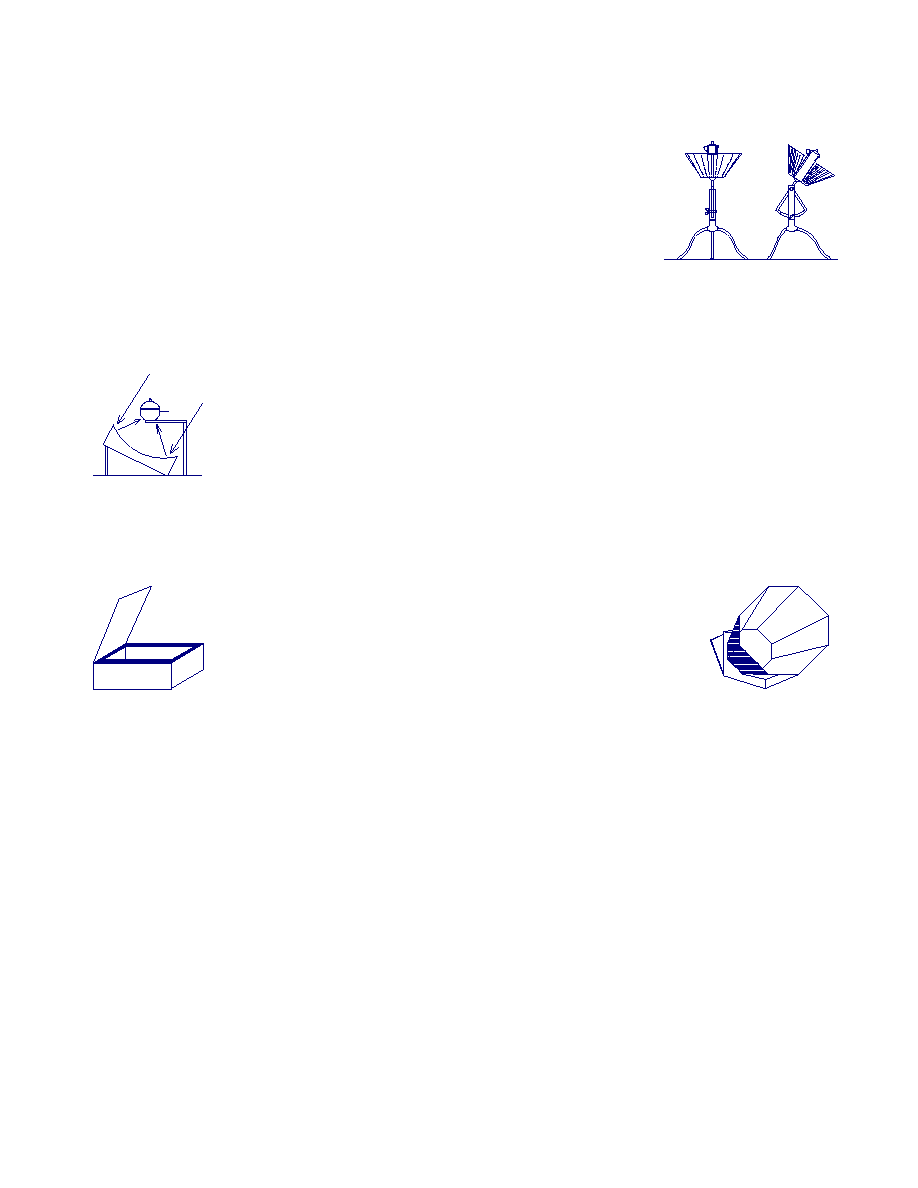
Open reflector type solar cookers focus the sun's rays on open cooking
pots or pans. Solar ovens trap the sun's heat inside insulated boxes with transparent lids. Most solar
ovens are variations of the bread box type developed by two Arizona women, Barbara Kerr and Sherry
Cole.
These simple box cookers created in the 1970's are now being used world
wide to overcome food shortages in developing countries. In places like Eastern
Africa native women travel 20 to 30 miles to gather a two day supply of cooking
fuel. In other parts of the world increasingly high rates of malnutrition are caused
by a lack of fuel. Basic grain foods cannot be cooked without cooking fuel and
water infected with chronic bacteria must be heated before drinking. Continued gathering of wood
cooking fuel by chopping down trees has resulted in eroded hill sides with loss of precious topsoil thus
reducing their ability to grow food.
In America we concern ourselves with such things as
operating costs, air pollution, acid rain and the green house
effect. Let's say it takes one hour to cook a pot of beans on an
electric stove using one kilowatt. The coal fired power plant
that supplied the electricity consumed one pound of coal and
released 17.5 cubic feet or two pounds of CO2. The power plant also consumed 0.7 gallons of ground
water and released traces of SO2 as acid.
Suppose you are cooking outside. Five pounds of steaks on a grill will use a ten pound bag of
charcoal and five ounces of lighter fluid. This fire will produce approximately 160 cubic feet or fifteen
pounds of CO2 and untold air pollution. Wood fires are even worse.
Cooking in the home averages over 100 hours a year consuming approximately 1,175 kilowatt
hours. At a cost of $0.10 a kilowatt hour this amounts to $117 a year. During the summer cooking adds
$50 to the air conditioning bill bringing the total to $167 a year. In Arizona, solar cooking can replace
70% of the cost of cooking. This will save 1,675 pounds of coal and 3,000 pounds of CO2 generation
from coal fired electric utilities.
Clearly solar cooking has come of age.
2
HOW SOLAR OVENS WORK
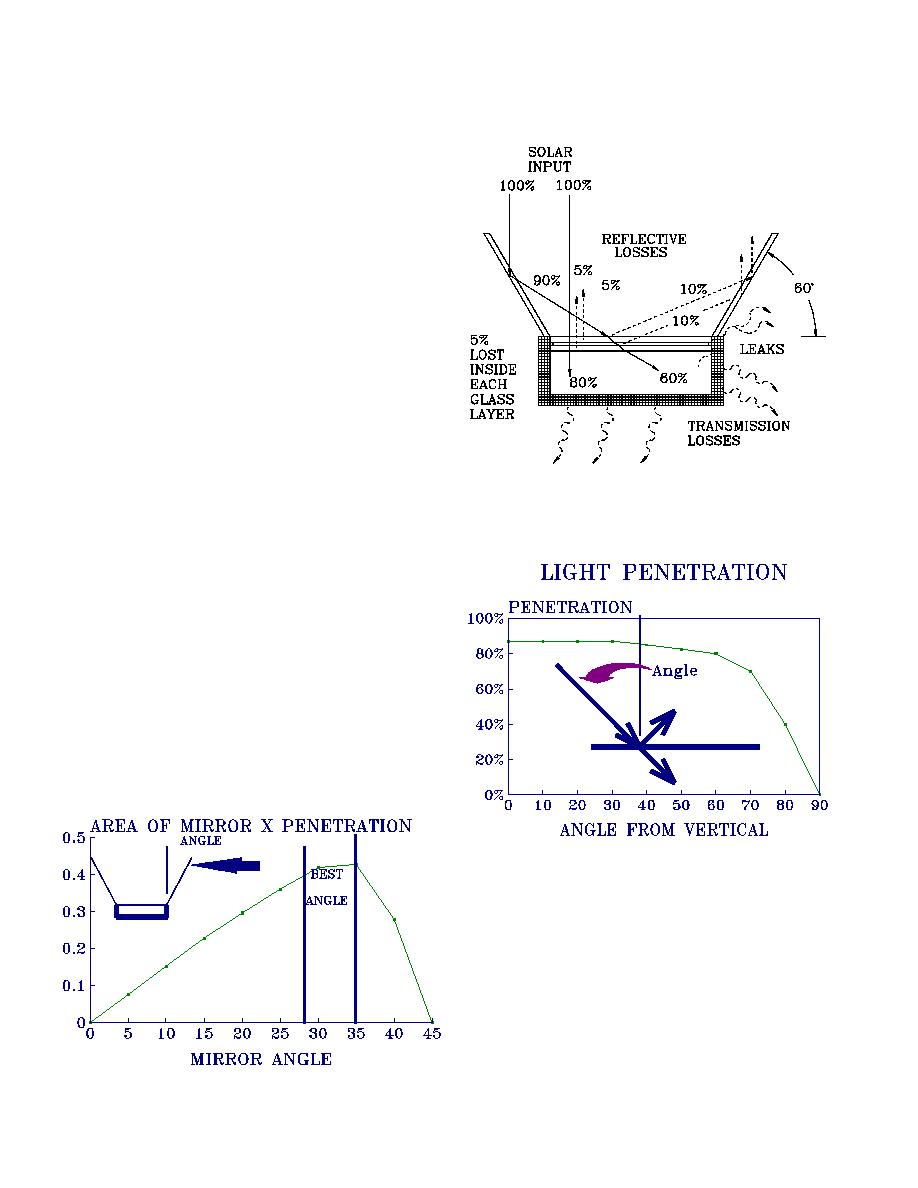
A solar oven's cooking temperature is
reached when the solar gain equals the heat
losses. Thus an oven's cooking temperature is a
balance between solar gain and heat losses.
Heat losses fall into five categories:
1. Reflective losses
2. Absorption Losses
3. Transmitted Losses
4. Leakage Losses
5. Food losses (Heat Lost To Cooking)
Solar gain is a factor of the total area
exposed to the sun and the effectiveness of
collection.
For the reflectors this property is
acceptable but for the cover glass, light must enter
the cooking chamber, or the mirrors are of no use. As a stone skipping across water, sunlight will skip
off the surface of glass without penetrating if the angle is too shallow.
An angle of about 30 degrees from the
vertical for the mirrors or reflectors yield good
penetration with a healthy spread for an optimum
use of materials. As it turns out a reflector equal
to the width of the cooking chamber produces an
optimum design for use of materials.
With such a fortunate set of circumstance
the reflectors can be folded to cover the cooking
chamber making the cooker portable!
Mirrors have a reflection of about 99% but lose
5% each time the light passes through the glass.
Polished metal surfaces have about 90% reflection but
no losses due to glass. The result is that each behaves
about the same.
Light striking the far edge of the reflector
should enter the cooking chamber at the far edge
opposite the reflector to be beneficial. An angle of 30
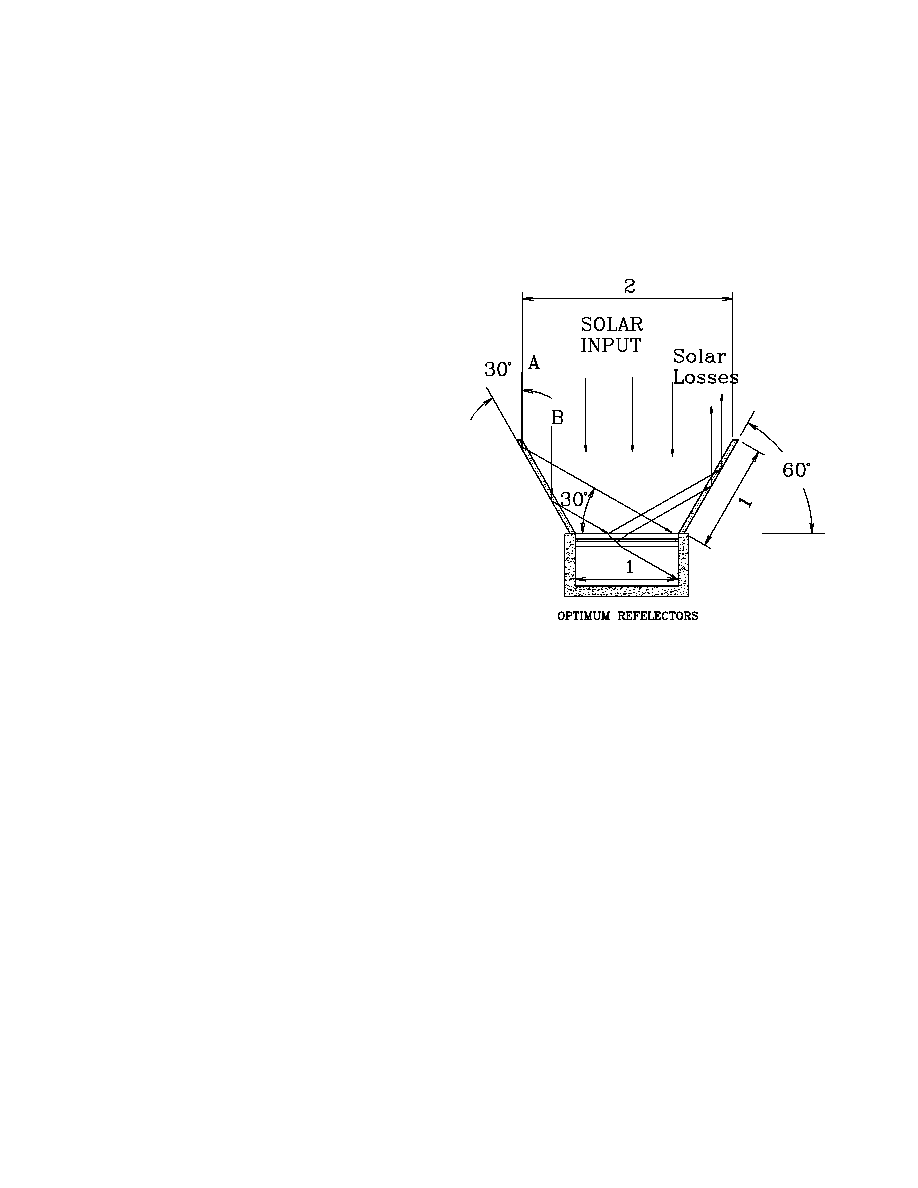
3
degrees from the vertical (or 60 degrees from the horizontal) with each reflector equal to the width of the
cooking chamber will allow all the light striking the reflectors to enter the cooking chamber. With this
geometry you can still fold the mirrors!
An optimum sized cooker will cook just about anything you put in it. Extending the reflectors to
make the collector larger will produce more heat and will cook food faster.
If you extend the
reflectors the cooker becomes less portable. Doubling the length of the reflectors increases its width by
only 20% because the angle must be steeper. The shallow sun angle on the reflectors makes them more
reflective. The penetration into the cover glass improves somewhat because of the more vertical angle.
Of the five factors affecting a cooker's
cooking temperature three of them were thermal
loss. Transmitted losses are controlled with
insulation. Double glass covers have twice as
much insulation value as single glass covers.
Leakage losses are controlled with good tight
construction. The chamber should be well fitted
and protected from moisture on the inside.
Solar heat is transferred into the food by
three mechanisms. First by direct solar rays, that
is sunlight striking the food directly. This is
somewhat like a broiler. Second by convection,
that is by the hot air surrounding the food inside
the chamber. Third by conduction of heat from
the tray upon which the food rests. If the tray is a
heavy metal conductor such as steel or aluminum the sun's rays will heat the tray and conduct the heat
under the food like a stove. All three mechanisms combine to make the food cooking process very
efficient.
Finally, as the sun's energy is transferred into the food the thermal loss drops the oven's
temperature 25 to 50 degrees initially. This loss is only temporary.
As the food approaches the oven's temperature the aroma begins to fill the air, that's the whole
idea behind solar cooking.
4
INTRODUCTION TO THE TRACKING SOLAR OVEN
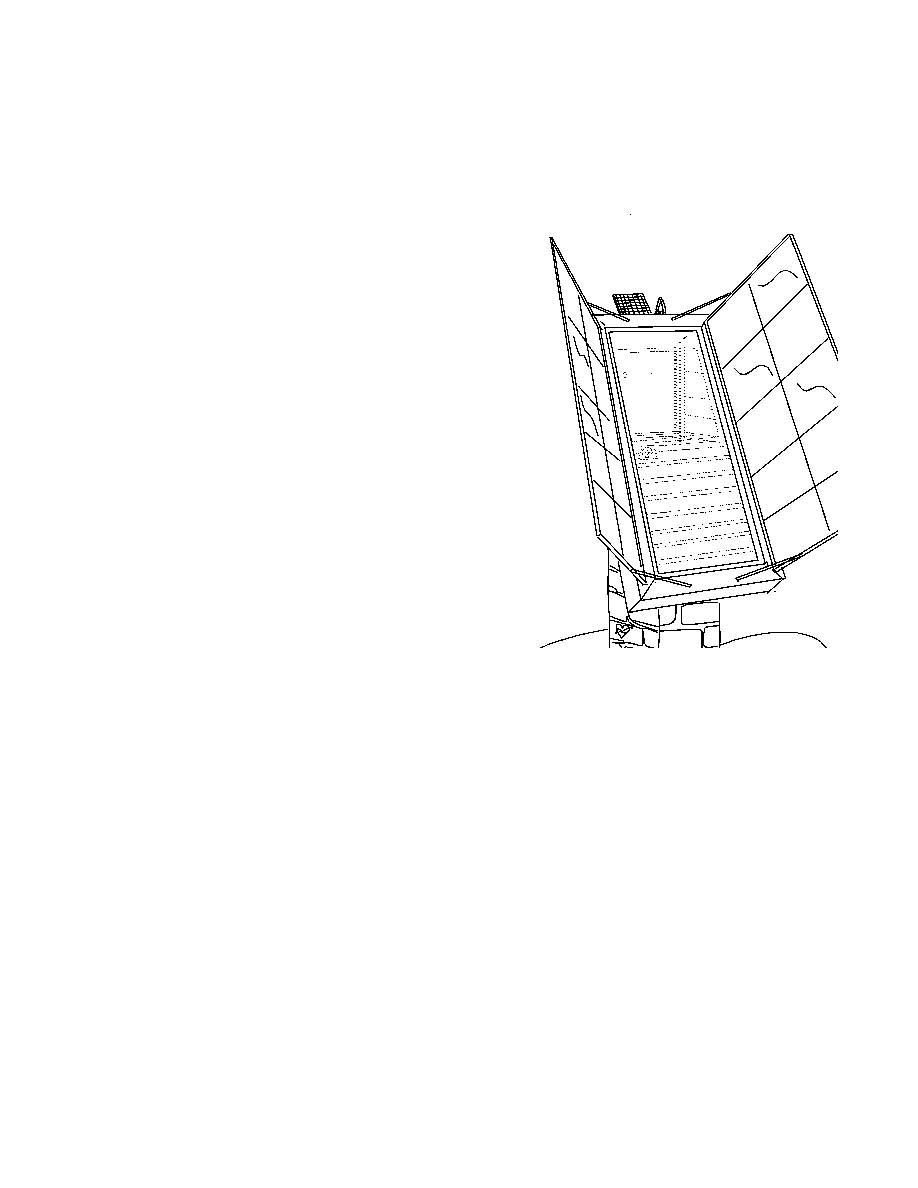
This modified box cooker has been labeled
high tech, because of its ability to follow the sun
under its own power. The design described here
is not that of a portable oven. Materials used are
durable and meant for many years of outdoors
use.
The main features are:
- Pedestal mounted where the oven is at
counter height.
- Fixed tilt such that the collector does not
have to be adjusted for the time of year.
- Uses both mirrors and flat plate collector
to concentrate the sun's heat into the
cooking chamber.
- Natural air movement increases
convection cooking and warms the
cooking tray.
- Rotation about a fixed vertical axis
allows tracking of the sun during the day
by manual or automatic means.
- Capable of heavy food load.
Energy saving is best achieved when the solar device is used to its fullest extent, thus the design
of this oven is targeted for widespread use by those who demand convenience. This design requires no
attention during the day when cooking a large meal.
These instructions will provide a basic summery of the construction techniques for building a tracking
cooker of your own. There are many construction techniques that will produce the same results.
5
HOW THE OVEN WORKS
As with all solar
cookers, mirrors intensify
the sun's rays into a glass
covered, insulated box with
a door for placing and
removing food. This oven
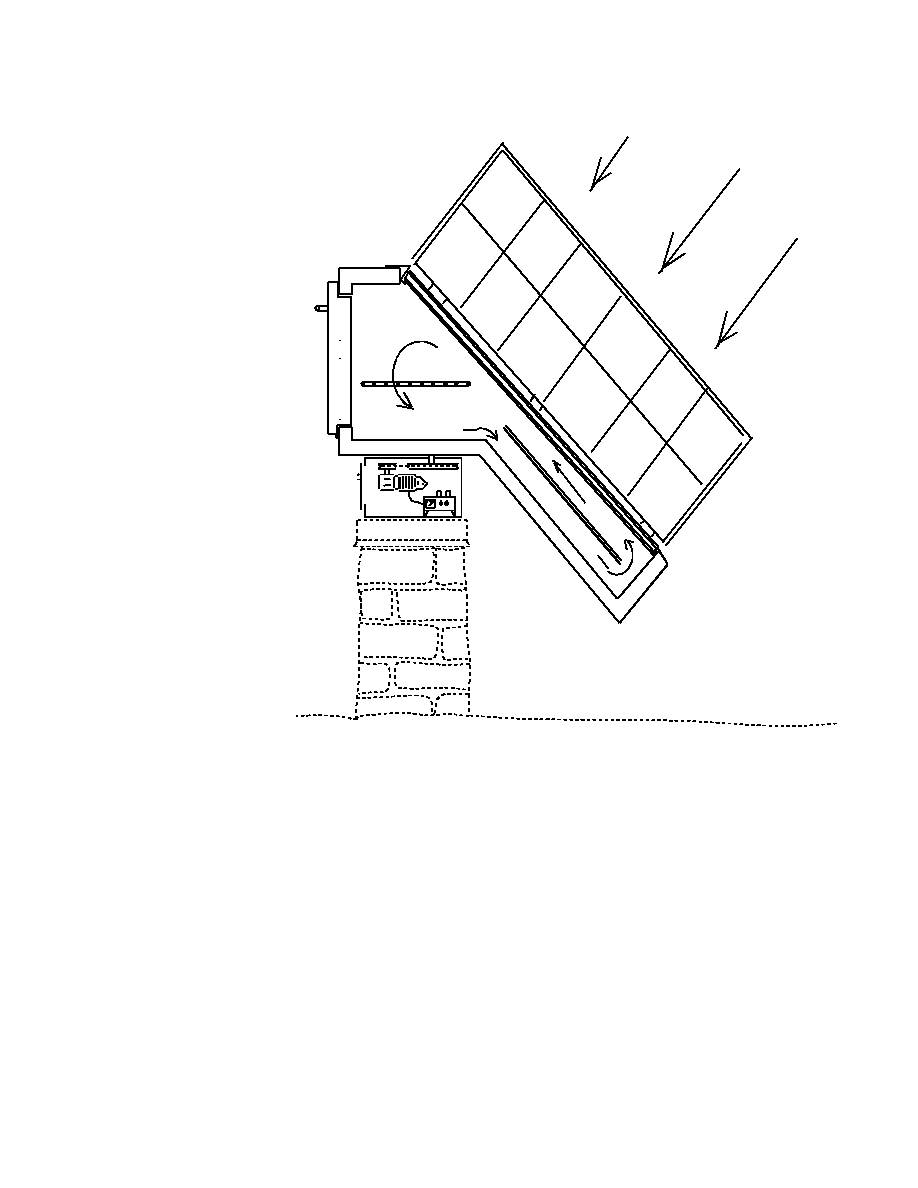
uses a built in flat plate
collector to collect heat on
the bottom to increase
efficiency. The flat plate is
very efficient and therefore
reduces the over-all size
yet providing a larger
cooking chamber. The
high temperatures required
for cooking require the use
of mirrors.
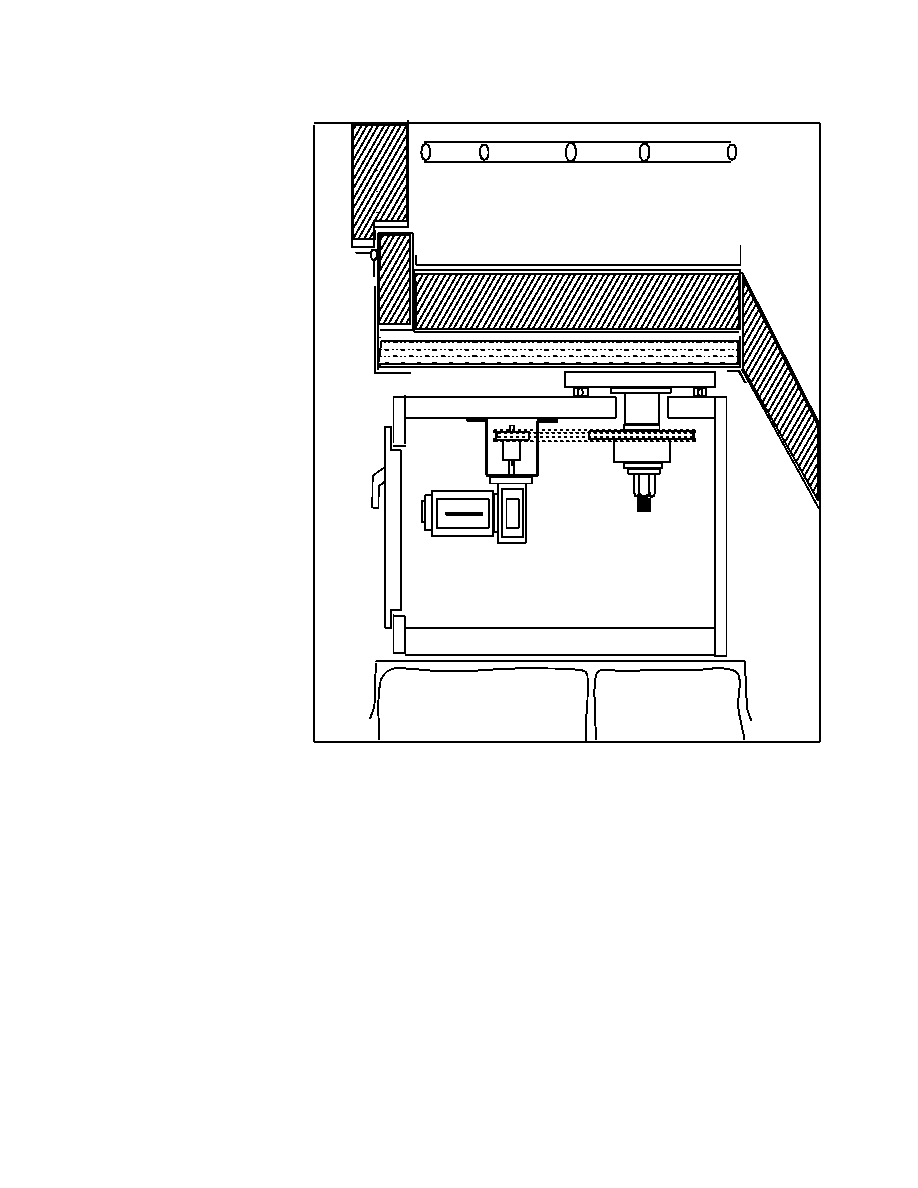
The diagram shows the
hot air circulation pattern
within the oven and
cooking chamber. The
mirrors may fold for easy
transportation of the
cooker.
The oven mount is a
fixed pedestal with a Lazy
Susan bearing. This allows the cooker to track the sun all day long. The tracking mechanism uses a very
small amount of electrical energy making it possible to operate the oven on small batteries and a photo
cell charger.
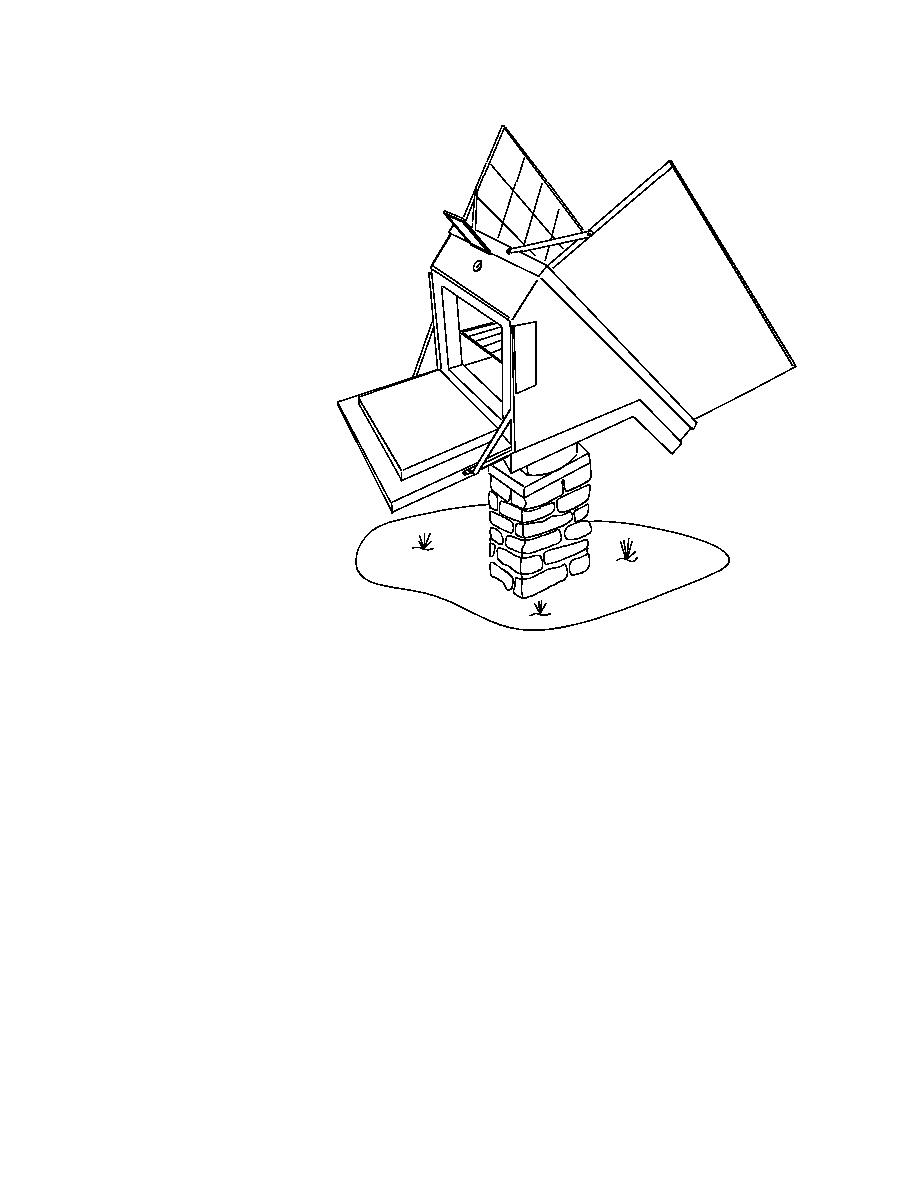
The oven door is at counter top height and is a standard oven size. These features make cooking with
the sun as familiar and easy as cooking in your own kitchen.
6
SHELL CONSTRUCTION
There are many
different ways to build an
insulated box or shell. My
first oven used foil covered
1 inch Duct Board used in
the air conditioning trade.
Using a sharp knife and a
flat iron you can form up
the shell in any size you
want using commercial
heat seal tape. Set the
angle of the face at about
your latitude plus ten
degrees measured from the
horizon (42 degrees in
Tucson) for the best
average performance all
year. When the shell is
complete another layer of
Duct Board is used to form
a liner. This will yield a
total of two inches of
insulation, with foil on both sides.
Sheet metal trim can be used to finish the shell, but most of the metal used consists of small sheets of
scrap metal. After the openings and corners are trimmed the large areas of the sides are left unprotected.
The duct board has been exposed to the weather for eight years without harm (except for the
woodpeckers); however, it is best to cover the sides completely with metal.
The door is sheet metal, one inch thick encasing duct board and two inches thick at the opening. A
leveling compound of silicone gasket paste was used to form a flat face gasket that is nearly air tight.
The door is attached with a piano hinge and a counter-weight, such that the door forms a shelf when
opened against fixed stops.
7
GLASS ASSEMBLY
The insulated glass
panel is easy to make from
ordinary window glass and
glass spacers. Have the
glass store cut half-inch
strips of quarter-inch plate
glass and two sheets of
single weight glass slightly
smaller than your opening.
Use the glass strips and
silicone adhesive to form
two layers of single weight
glass separated by a frame
of quarter-inch glass
spacers around the outer
edge. This forms an air
space between the two
glass sheets. A drain or
vent hole to prevent
pressure buildup inside the
air space is required. The
glass panel can now be
sealed into the opening
making the oven rain-tight.
Recently I added a third
glass layer to make a triple-
insulated cover that increased the cooking temperature 25 degrees F.
The mirrors should be the twelve inches plain edge type mirror tiles glued onto two overlapping flat
pans. Mirror tiles have the thinnest glass and make the best reflectors. The mirror pair will then nest
together when closed. The mirrors must be mounted at sixty degrees from the opening for best
performance. Knee hinges from an old folding table have work very well to hold open the mirrors and
later to fold up when needed.
8
BASE CONSTRUCTION
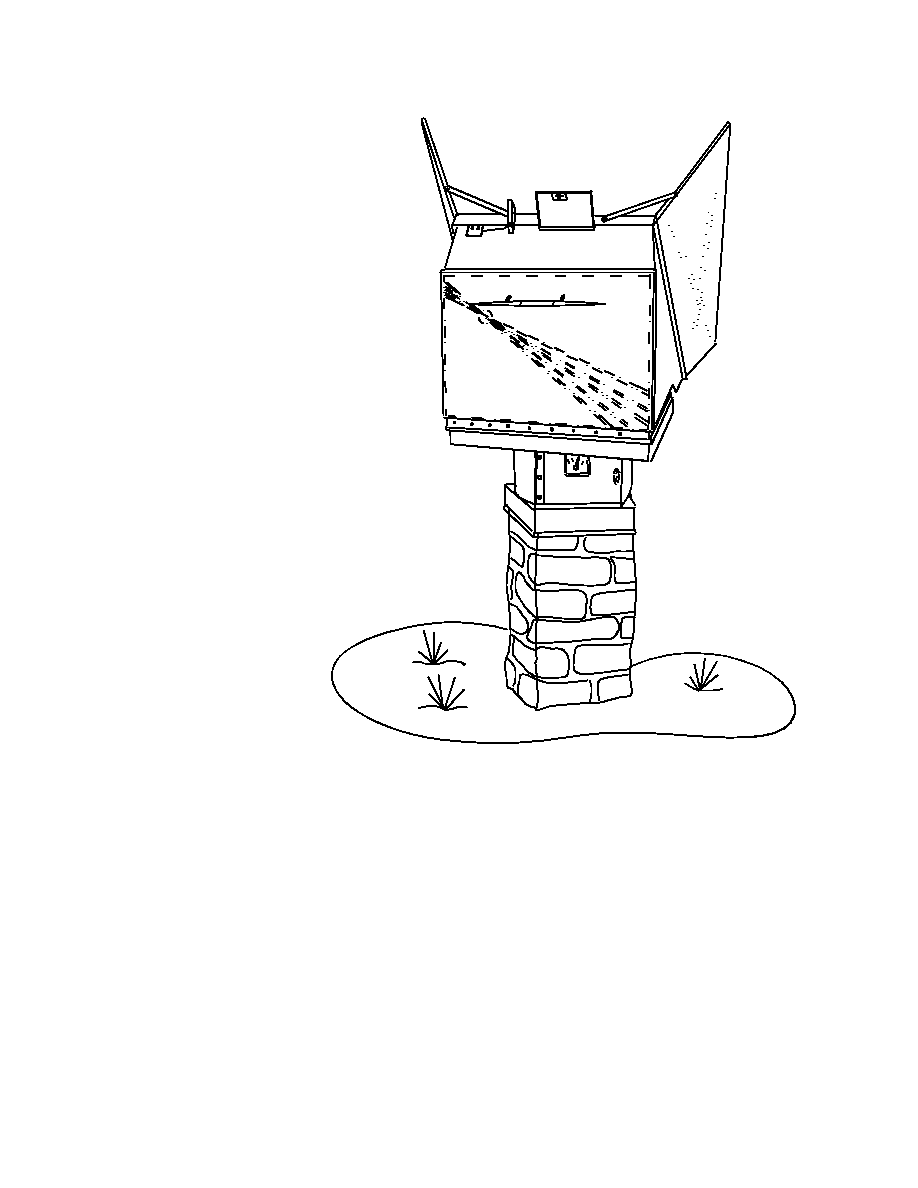
The base should be
cylindrical shaped with a
flat side for the door.
Since the oven is supported
by the base, the material
used should be strong
enough not only to hold the
weight of the oven but
support it during high
winds as well.
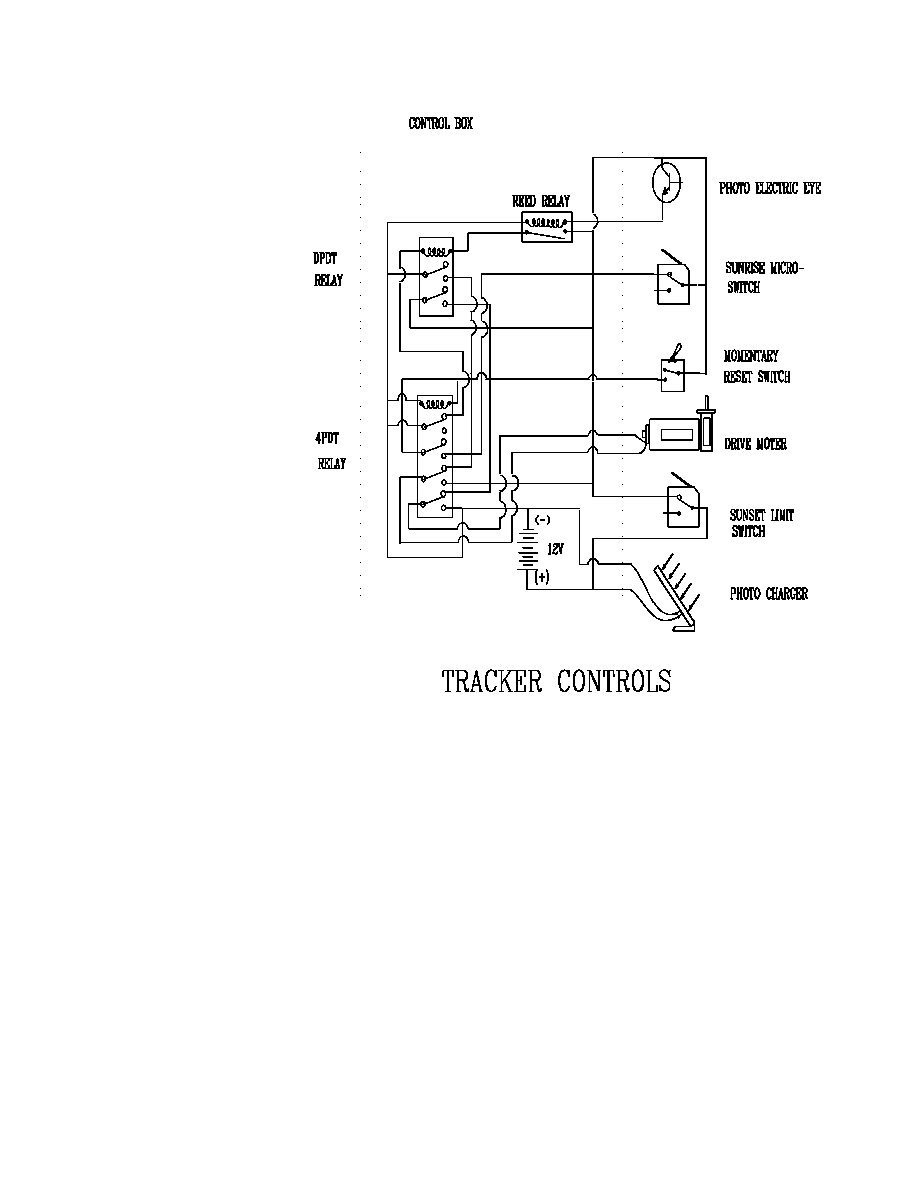
The motor is a critical
part of the design. A 12 to
24 volt DC reversible gear
head motor is needed
which turns at 1 to 5
R.P.M. To further slow
the turning rate of the
oven, a chain and sprocket
with a ratio of about 3 to 1
seems to work very well
for final turning speed of 1
to 1/2 R.P.M. The large
sprocket should be placed
on the shaft connected to
the oven base between
leather washers to form a
slip clutch to protect the drive motor and for safety reasons.
9
THE TRACKER CONTROLS
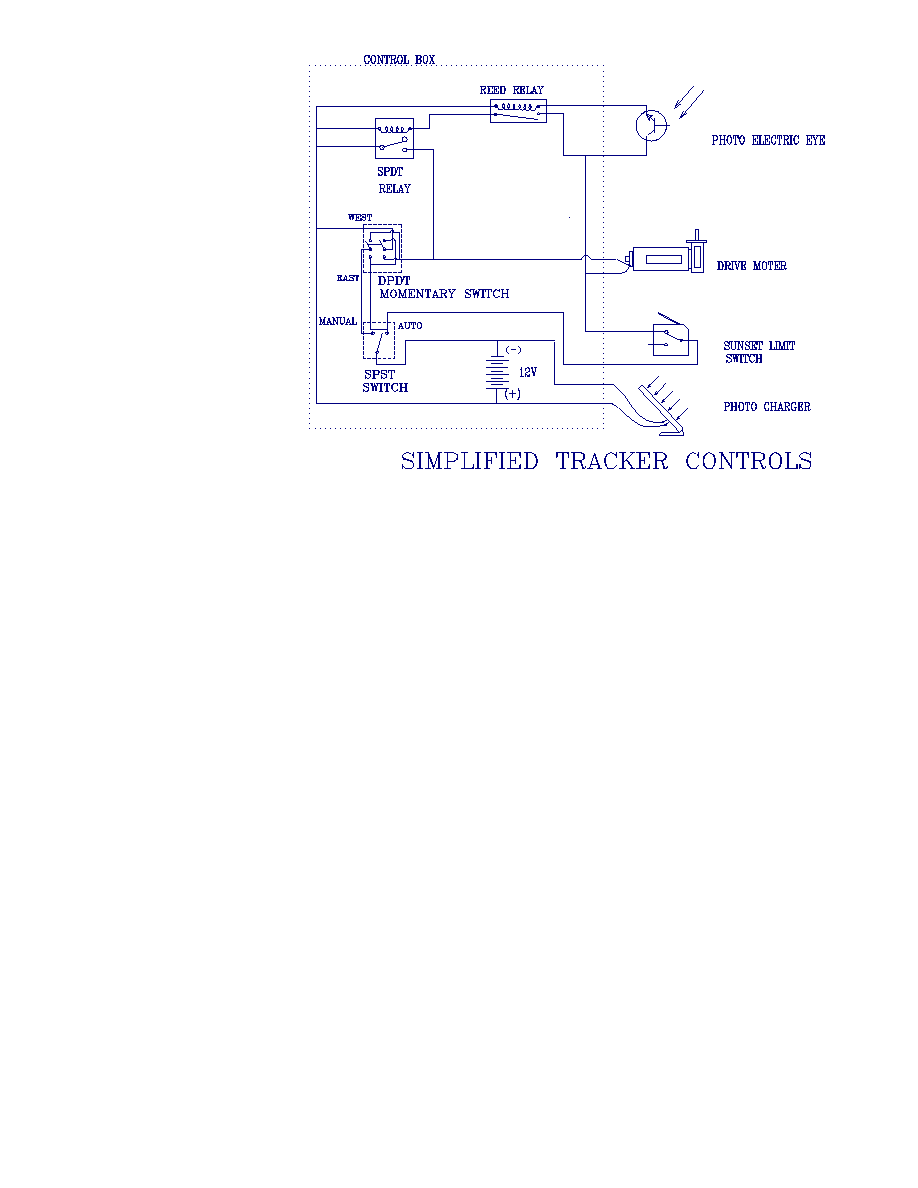
The heart of the
Tracking Solar Oven is the
electronic control. A Very
simple control may be built
from a photo diode
(Electric Eye) and 12 volt
DC relays. Most of the
parts are available at local
radio parts stores.
The photocell battery
charger that works well is
the new thin film, glass-
encased type that produces
18 to 20 volts and
measures only 6 inchs
square. The batteries are
simple AA nickel cadmium
rechargeable cells in series
to produce 12 to 15 volts
at 50 to 80 milliamperes.
The photo diode
(Electric Eye) is really a
photo-transistor using only
the emitter and collector
leads which conduct electricity in the presence of light. A simple shadowbox will shade the electric eye
when the oven is focused on the sun and will cause the motor to stop. At first, the photo diode is far too
sensitive. To adjust the sensitivity black silicone can be dabbed over its surface then removed with a
toothpick until it responds only to direct sunlight. The reset switch will send the motor into reverse until
the sunrise switch is tripped. The oven is now positioned for the next day. A wind-up 12-hour timer
switch on the reset switch will allow timed cooking; it sends the cooker to the sunrise setting when done
and even sounds a buzzer.
Conventional solar trackers are available and can be adapted for use on this or almost any other solar
cooking oven.
10
After experiencing
trouble with the tracker
control I disassembled the
controller only to find the
problem was caused by a
sheet metal screw that
penetrated one of the wire
cables. When I
reassembled the controller
I found it works equally
well without all the extra
automatic features. This
simplified version of the
controller is now in use and
serves the purpose.
The material costs are about equally split between the shell, glass and electronics. The total Cost was
approximately $300.
The tracking solar oven is a unique design. The idea for the oven was conceived in 1985 after the
annual solar cooking demonstration in Tucson. The design received the "Clifford C. Sawyer
Achievement" for individual technological achievement in application of engineering principles, American
Consulting Engineers Association, 1993.


